

Graphics by Maeve Huttner
By Megan Doherty, WERS Staff Writer
After months of social distancing, you're probably getting a bit stir crazy. Streaming classic sitcoms for hours on end might not be cutting it anymore for entertainment - It's completely understandable. So, why not take all this extra downtime to learn a new skill?
Playing guitar may seem a bit daunting at first, especially when you're starting at level zero. But, I think that's why it's so much fun - you can truly see how much better you've gotten. Also, teaching yourself allows you to see how much you're capable of. There are so many online resources for teaching yourself to play guitar, so if you're confused or overwhelmed, here's where to start:
Make it fun!
Like any skill, playing guitar well takes a lot of time and practice; That doesn't mean you have to create a rigid routine, though. You shouldn't be sacrificing your fun just so you can figure it out faster. When you genuinely enjoy practicing guitar, it leads to you being a more consistent player. That's what makes good guitarists.
Start off by picking a song you like, then look up the chords. I like using Ultimate Guitar's website and app. You can also check out our post "Ten Songs to Help Teach Yourself Guitar" for some inspiration. If the first song you choose has a lot of chords or more complicated chords, keep looking for a simpler song with only 2-4 chords. Sublime's "What I Got" and John Denver's "Leaving on a Jet Plane" are great choices. Together, they only use the three chords G, C, and D.
Learning Open Chords
Once you have your song, it's time to figure out how to play the chords. If you picked one of the songs mentioned above, you only need to learn the G, C, and D chords pictured below.
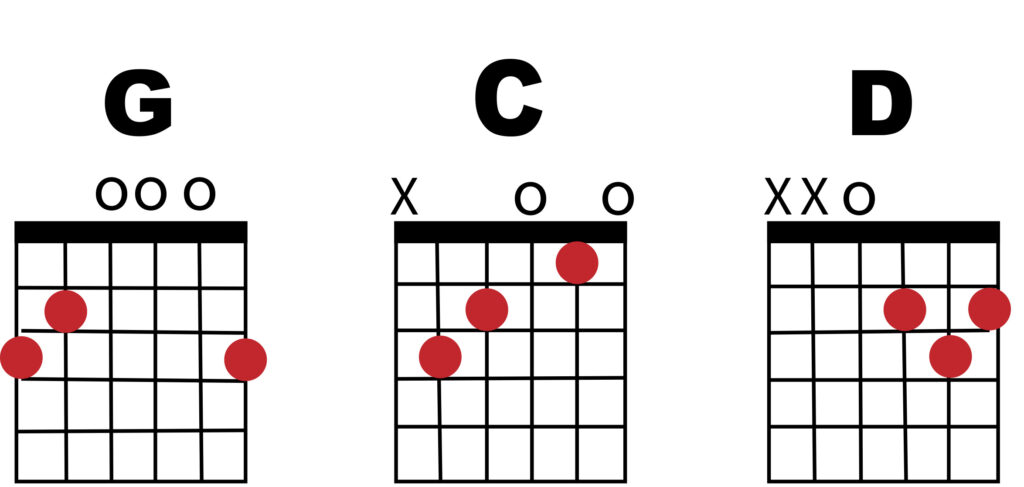
Diagram of GCD chords
On the chord diagrams above, imagine the guitar is facing you and being held upright. The top horizontal line represents the nut, which is closest to the head of the guitar (where the tuning knobs are).
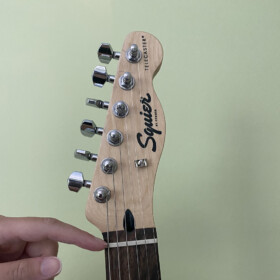
This is the nut!
The other horizontal lines represent the first few frets. Frets are the horizontal lines that go down the neck of your guitar. The six vertical lines represent the six strings on your guitar. The thickest string is on the left, and the thinnest string is on the right. From left to right the notes are E A D G B e.

The frets of the guitar
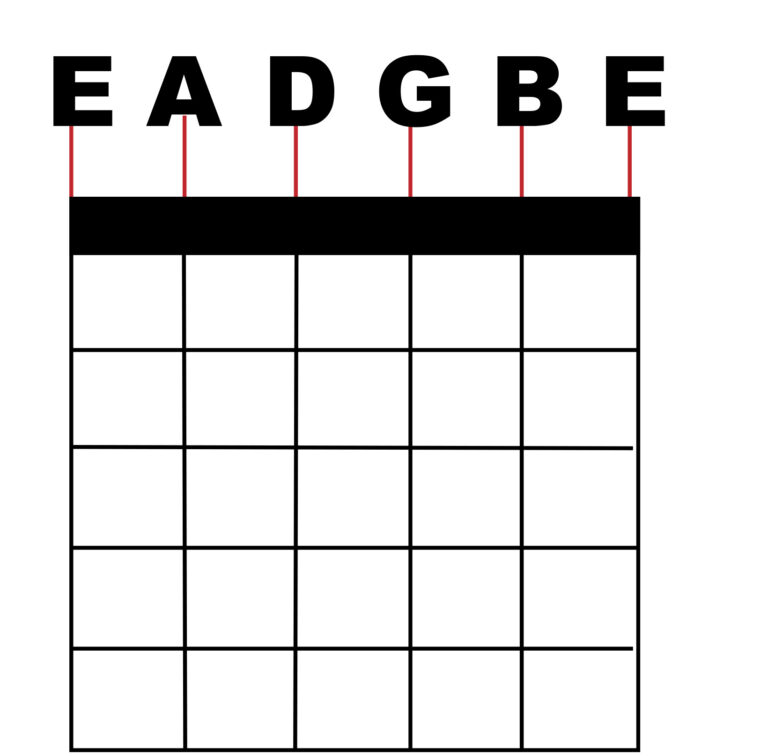
The six guitar strings
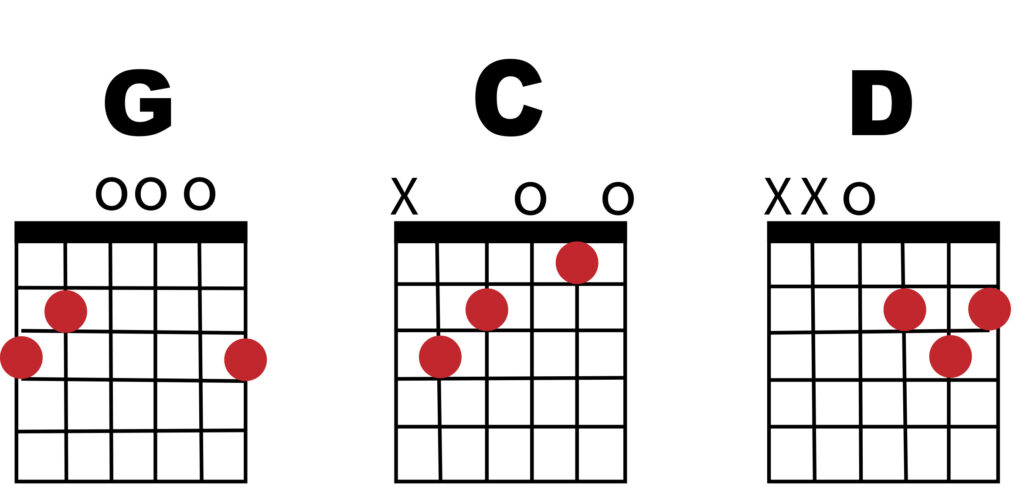
(Same diagram of GCD chords from above)
Notice how on the chord diagrams there are X's and O's above some strings. If a string has an X over it, it means you don't strum that string when playing the chord. If there's an O above the string, it means you play that string open, with no fingers pressing down on it. Make sure none of your fingers accidentally touch that string while strumming so it rings.
Finally, the black dots indicate what string and fret your fingers should press down on. For example, a C chord should look like the photo below. Your pointer finger presses down on the B string on the first fret. Use your middle finger to press down the D string on the second fret. Lastly, your ring finger pushes down the A string on the third fret. Strum every string except the low E string.
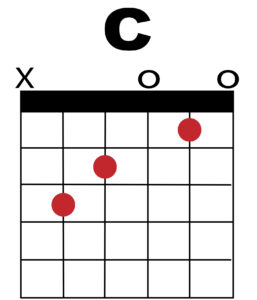
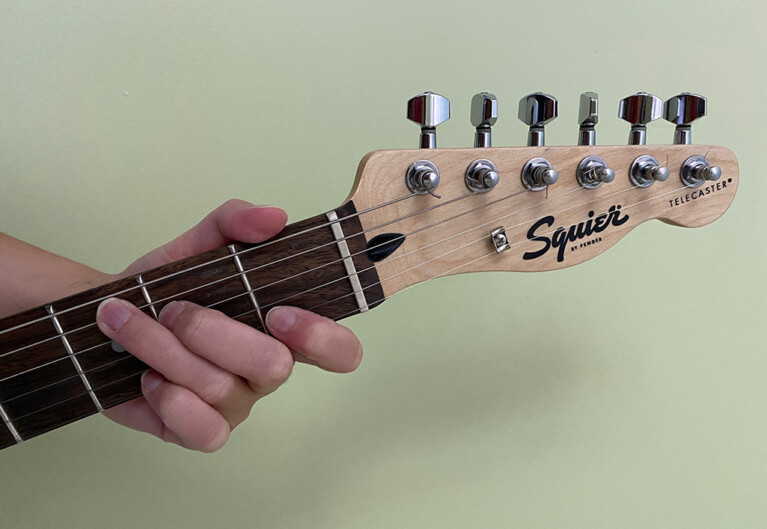
(Diagram and Picture of C chord)
The first chords that you should learn are open chords, which are A, Am, C, D, Dm, E, Em, G. So, try to pick songs that only use these chords at first. Also, when you're looking for a song, check to see if you need a capo to play the song. A capo is a clamp that fastens across all of the strings to raise the tuning. So, if you do not have a capo and the song calls for a capo, it will not sound correct.
Strumming and Timing
Once you've figured out how to play the chords in your song, focus on strumming. Every song has a strum pattern. You can listen to the song to mimic what you hear while playing. If you want a better visual of it, watch a video of someone playing the song and pay attention to their strum pattern. This is incredibly important. Strum patterns are what make songs distinct. For your playing to sound right, you need to have the same strum pattern as the original song.
Switching between chords will be a little tricky and frustrating at first, but keep practicing. Once you get more familiar with the different chord shapes, it gets easier. When you're more comfortable with the chord switches, try playing along to the song. Hearing the song as you play might mess you up at first, but it helps you get the timing right. Soon enough, you'll be able to switch chords blindfolded.
Barre Chords
Once you get comfortable playing open chords, you can try playing some barre chords. A barre chord is a chord where you use your pointer finger to push down multiple strings on the same fret. Then, with the rest of your fingers, play one of the open chords. The bar you make with your index finger acts like the bar that's at the base of your guitar.

(Diagram of barre chords)
If you want to play a song with a barre chord, but you're not able to play them yet, you still can. Follow the chord diagram, but only place your fingers on four or five strings that are on the higher-sounding side. Remember to only strum the strings you have fingers on. That way the chord is still the same. Playing this way first might make it easier for you to transition into playing full barre chords.
Moving chords up the guitar neck
Playing barre chords opens up the rest of the guitar neck for playing. Because of that, they make up the overwhelming majority of guitar chords. For instance, look at the E and F chord diagrams. They have the exact same shape. However, to play an F chord, use your pointer finger as a bar before making the E shape one fret up.
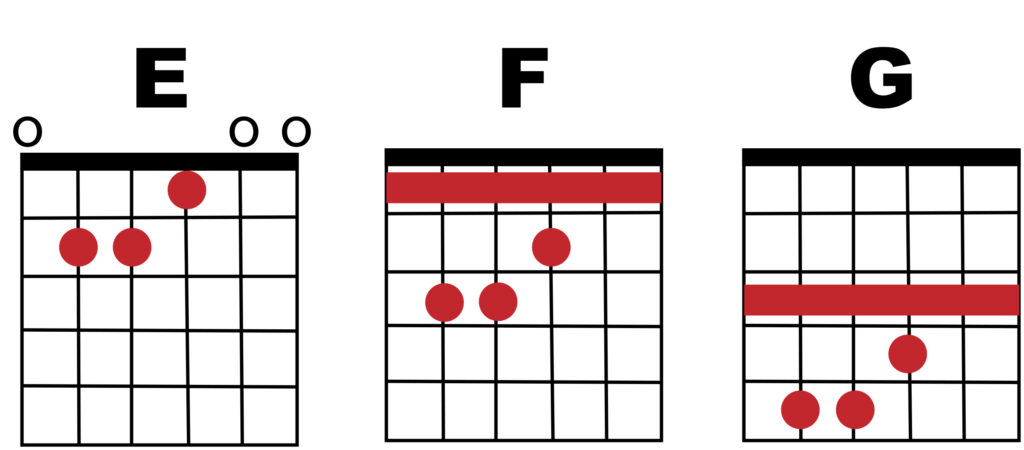
(Diagram of E, F, and G chords)
You can continue using the exact F chord shape to move up every fret and play different chords. For example, if you keep your finger positioning the same but move everything up one fret, you're now playing an F#. Move it all up another fret, it's now a G.
To play minor chords throughout the guitar neck, use the Em shape as your base chord. Then, use your index finger to create the barre two frets down. You can use this shape all throughout the guitar neck as well to make various chords.
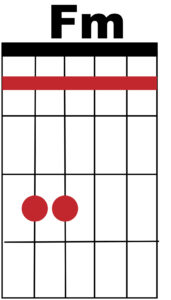
(Fm diagram)
There are also barre chords that only use five strings. These chords are based on A and Am. Like the others, keep their shape and you can move throughout your guitar neck. These barre chords are the most common. However, you can keep the spacing of any open chord, add a bar with your finger, and play it on any fret.
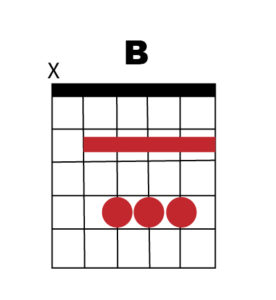
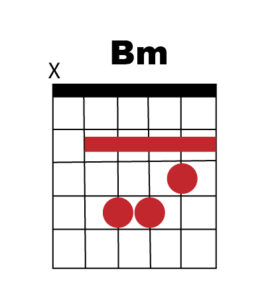
(B and Bm chord diagrams)
You can tell what chord you're playing by knowing what the base chord is (usually E, Em, A, or Am). Next, look to the lowest sounding string and figure out what fret your finger is on. If you're playing a barre chord that uses all six strings, then the lowest note is on the thick E string. So, you would count up the frets to figure out what the note is. Frets 0-11 go: E, F, F#, G, G#, A, A#, B, C, C#, D, D#. Then they repeat. This means the 12th fret on the low E string is an E. Every fret you move up from there follows the exact same note progression listed above.

(Diagram of fretboard with low E string and A string notes)
The same note progression is used for every other string. However, the starting note varies. So, for the A string, playing it open starts as an A note. Then, as you move up a fret it counts up notes just like the list above. That means if you're playing a barre chord that uses the base Am shape and you're on the fifth fret, you're playing a Dm. This is because the lowest note being played is a D, and you're using the Am shape.
Playing Riffs
Want to play a cool riff? Look up some tabs! Tabs are a great way to figure out how to play riffs, licks, and guitar solos when you're first starting. Look at the tab diagram below. The line at the bottom represents the low E string, the thickest string. Then the rest of the guitar strings follow as you move up. The numbers indicate what fret your finger should be on and on which string to play the song. To figure out the order to play the notes, read the numbers as you regularly read, left to right. When the numbers are spaced closer together, it means you should play that part faster. If the numbers are stacked in a vertical line, play all those notes at once. The best way to figure out the timing though is to listen to the original song and match it.
e| -------------------------------------------------
B| -------------------------------------------------
G| -------------------------------------------------
D| ------------------2--0------4---------0--2----
A| ------------2-------------2-------2------------
E| -0----3-4--------------------------------------
This is the first riff in "Day Tripper" by The Beatles
Reading Tab Letters
If there's a "b" next to a number, that means you need to bend the string to reach the desired note. Usually, the same note as the bent note is about one or two frets up on the same string. So, try to match that note to your bend. Strum the string before you start bending it. Then let it ring as you push the string up or down with your fingers. I find it easier to bend a string using both my middle and ring finger at the same time. It gives you more control over the string and the note you're trying to reach. Just make sure your ring finger is still on the correct fret.
When there's an "s" in between two numbers, slide your finger from the first fret listed to the fret listed on the other side of the letter. So if the D string on a tab says "7s9," put your finger on the seventh fret on the D string. Hit that note, then slide that finger up to the ninth fret on the D string without taking pressure off the guitar neck. The D string should be ringing the whole time.
The last important letters to know for reading tabs are "h" and "p." If there's an "h" between numbers, it means "hammer-on." So, strum the first note listed. Then, without taking your first finger off the fret before the "h," use another finger to hit the second fret listed. I usually use my pointer finger for the first note and my ring finger for the second. This makes the sound jump straight from the first note to the second without any sliding or bending.
When there's a "p" between numbers, it means "pull-off." Essentially, this is the opposite of a hammer-on. To do a pull-off, use your pointer and ring finger to push down on both frets specified. Hit the string. While still pressing down, pluck the string with your ring finger. To pluck, grip the string with your ring finger then move down and off the string.
Get ready to rock!
Now that you have the tools you need to figure out how to play guitar by yourself, practice, practice, practice! Like with any skill, learning how to play guitar doesn't happen overnight. It takes a lot of time and repetition to even be able to play a barre chord, so don't get discouraged. There are countless resources online to help, so take advantage of them. You don't need to follow a program. There are so many YouTube videos that thoroughly explain and demonstrate almost everything related to playing guitar.
Your fingertips will hurt at first. It might only take 20 minutes of playing for your fingers to hurt so much you need to stop. With enough practice though, you'll develop calluses. The more you practice, the thicker your calluses become, and the longer you'll be able to play. Just keep picking songs you love to jam to and rock on.


